How To Make A Jack Daniels Candle

jack daniels candle

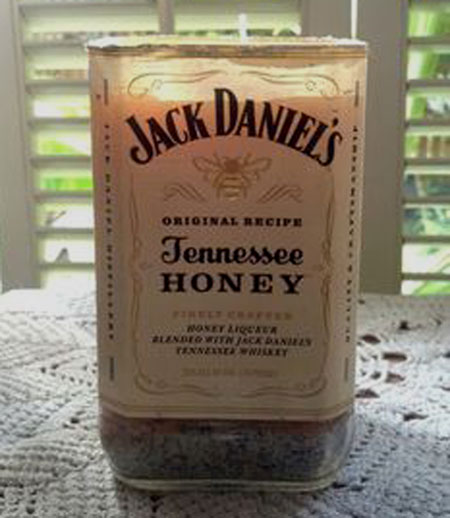
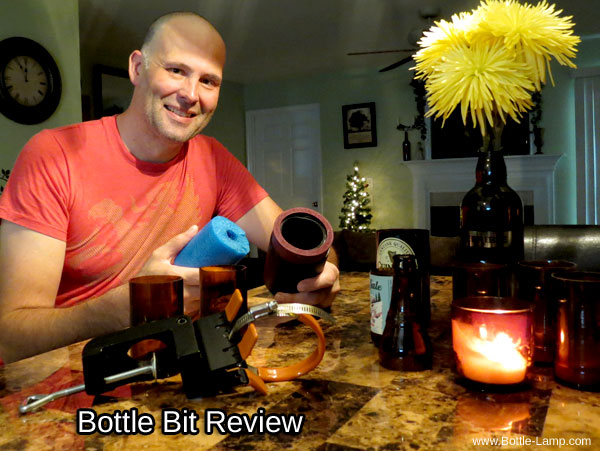
Make a Jack Daniels bottle candle by following these easy steps.

The Pinterest pin for this DIY idea is one of our most popular ones, getting shared thousands of times. We decided to make this easy, illuminating craft project to share with you.

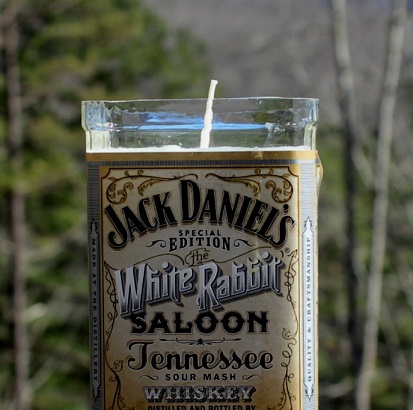
A couple of weeks ago we went to tour the Jack Daniel Distillery in Lynchburg, TN with our friend Mark. He bought a bottle of Jack Daniel’s Special Edition ‘The White Rabbit Saloon‘ Tennessee Sour Mash Whiskey that is only sold at the facility in Lynchburg. We helped Mark drink the whiskey (which was very good by the way) while he was visiting us and decided to give him the empty bottle back in the form of a candle, as a keepsake. Scroll down to learn more about this one of a kind whiskey.

Candle made from Jack Daniel's bottle.

Tools used to make this DIY project:

The Creator’s Bottle Cutter

Saber Tooth Sanding Kit

The items used in this DIY project:

  • 1 lb.+ of premium wax
  • 1 – 8″ wick
  • 1 empty, cut bottle of Jack Daniel’s

supplies for making candles

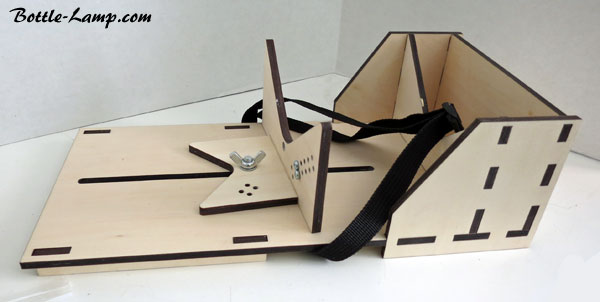
I have used the Creator’s Bottle Cutter for quite awhile now. It is easy to operate and very reliable. With that said, this was actually the first time I scored a square bottle. Our friend Ray put together a really good video ‘Square Bottle Cutting 101‘ describing the process and I simply followed along.

Running the score line over the square bottle turned out to be rather easy. With the bottle cutter set in the up-right position, I simply moved it around on the base platform until I had come full circle.

Jack Daniels Bottle Cutting

With the bottle scored I went ahead with the separation process using the hot candle and cold water shock method.

Using this method rather then running hot water over the bottle was necessary to avoid getting the label wet. The label is what makes this bottle so unique and the fact that our friend Mark was with us made it even more of a keepsake.

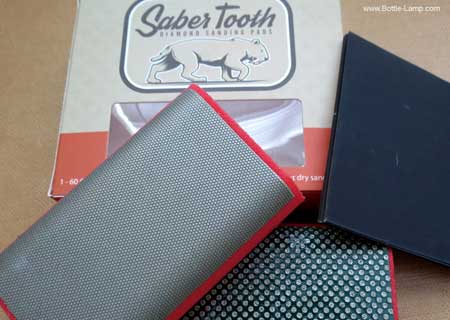
The separation was nice and clean but I wanted to give it a nice finish. With the Saber Tooth sanding pads I was able to give it that nice polished look in no time at all.

Sanding Jack Daniels Bottle Lip

Once the lip of the Jack Daniels bottle is nice and smooth you can begin with the candle making part.

Use a double boiler to melt the wax. We found an old pot for $.50 at a second hand store and placed it inside a big frying pan filled with water to melt the wax. Use a thermometer to make sure the temperature of the wax doesn’t exceed 200 degree F. Once the wax is melted you can add candle fragrance if you want.

We didn’t have any on hand, so I thought we could add a little Bourbon Vanilla Extract. Well, it didn’t work, the vanilla just kind of beaded up in the wax, so be sure to use the proper stuff.

Melting wax to make a Jack Daniels candle

To hold the wick in place we used a small amount of super glue in the bottom of the bottle, that didn’t work either. Once we poured a small amount of hot wax into the bottle, the wick became loose again and we had to hold it in place while the wax was cooling.

Candle Wick in a Jack Daniels bottle

Making a Jack Daniels Candle

We slowly poured the rest of the wax into our Jack Daniel’s bottle. Again we had to hold the wick so it didn’t collapse into the hot wax. This part was a bit of a pain! Maybe attaching the wick to a stick or something, and letting it dangle into the bottle from the top would work better? We will try that the next time we make a candle.

Jack Daniels Bottle Candle

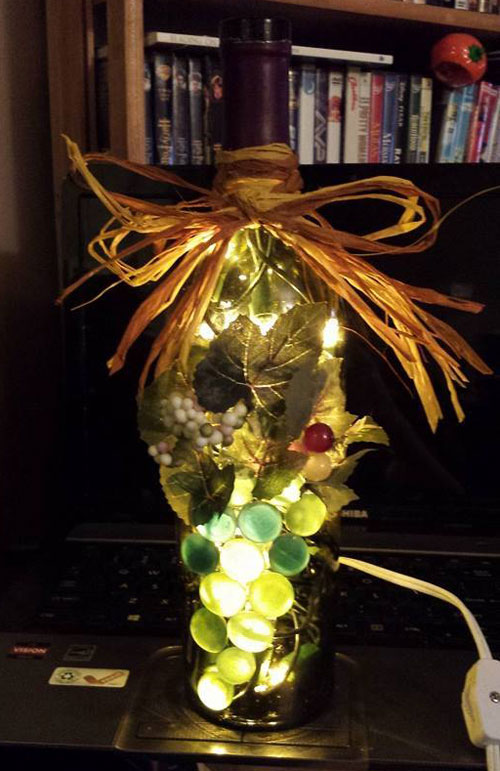
The end result turned out very nice!

One more tip… if you use a 750 ml bottle like you see in these pictures, be sure to have extra wax on hand. Once the wax cools and dries, the wax will shrink and you’ll end up with a concave on the top of your bottle candle. This can easily be filled in with a little more melted wax.

Jack Daniel’s The White Rabbit Saloon

Mr Jack Daniel was known to have a taste for a well-told tale and the company of good friends. They’re some of the reasons why he owned the White Rabbit Saloon on Lynchburg’s town square. The saloon was a favorite Lynchburg gathering place where he and his friends could spend time together and enjoy a glass of Mr Jack’s fine Tennessee Sipping Whiskey.

When you purchased a liquor from Mr Jack’s elegant & reputable establishment you knew where it came from …it was made right down the street. Nobody could rectify or doctor his goods because he ran his own distillery in Lunchburg and stood behind every drop (he was only 5′ 2″ tall). :)

The free tour at the Jack Daniel’s Distillery is very informative, but doesn’t include a tasting. You do get to sniff the whiskey after it went through the charcoal filtering though. Be sure to stop in if you’re ever in the East Tennessee area and pick up your own bottle of Jack Daniels White Rabbit Saloon whiskey.

Jack Daniels White Rabbit Saloon

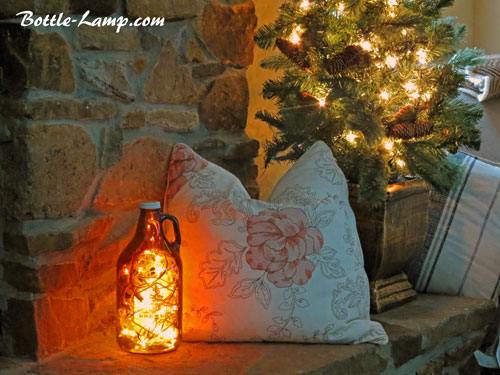
We hope you will give candle making a try using your own cut Jack Daniel’s bottle! They make great gifts… and remember to share your DIY Show Off’s with us and our readers.

What do you think of our Jack Daniels candle? Leave us a comment below. 


Glass Bottle Sanding Made Easy

Gold Bottle Plant Holders

You want to have the right tools for sanding your glass bottles whether you are new to glass bottle cutting or a seasoned pro.

I have a shelf out in the garage that I use to set aside my favorite glass bottles.  The method to this madness is that ‘when I get around to it’, I’ll do something really cool with it. After awhile the shelf starts to get noticeably fuller and finally it comes down to either doing the project or filling the recycle bin. I prefer the former. ;)

Gold Bottle Plant Holders

Inspiration strikes – Sometimes all it takes is a little spark. Silke had seen some small plants on sale at the local grocery store. They were marked so low I told her to just take them all. She confessed to not having enough pots at the house to put them in. Suddenly my shelf full of bottles didn’t look crazy after all. When I got done she would have more than enough plant holders. Challenge accepted!

I’ve been scoring and separating bottles for a while now and the only conclusion that I’ve come to is that no two bottles are the same. The labels may look identical but at the end of the day the glass composition is unique to that bottle alone. The long and short of it? You really never know what will happen until you do it.

Cut Bottle Vase

With my bottles scored I started my hot/cold separation. One of the bigger bottles left a shard that was so big I really began to wonder if it was even worth keeping. The score line was still running through it and the rest of the bottle that did separate came off beautifully. I brought it back outside and ended up using a pair of pliers to take the shard off.

Putting some tape over the teeth of my pliers provided enough protection to avoid metal on glass. What I ended up with was pretty close to a level surface, but it was still a pretty ugly, jagged rim. It was time to dig out the big guns to salvage this cut bottle.

The ‘go to’ tools for the job. I’ve reviewed the Saber Tooth Diamond Sanding Pads awhile back. These sanding devices have saved more bottles then I can count and they are mandatory to use after every glass bottle that is cut. I don’t care how perfect the bottle rim may look.

Taking the extra step of ensuring that you have a nice smooth edge on your finished product is a must, not only for myself but the end user as well. I don’t want Silke to cut her finger on a sharp edge while watering or moving the plants.

The big glass bottle that I had to sand was going to take some extra elbow grease to get it to where it looked descent. I had my work cut out for me!

Saber Tooth sanding pads by Bottle Cutting Inc.

Who’s keeping track of the time? I lost track of time. My only tell tale sign was that my back was starting to tighten up from standing stretched over the bottle for so long. I was going back and forth between the two sanding pads to try to work out the divots. It took a little work but by the time I was finished only I would have known how bad the bottle rims had originally looked. Sorry, I forgot to take a pictures while sanding these bottles. Here’s one I took last summer.

Sanding a cut bottle

I will tell you right now that if I hadn’t had these sanding pads there is no way that I would have stood and sanded this bottle as long as I had. The ergonomically designed holders are easy to keep in place and having the diamond tipped pads makes such a huge difference over conventional wet sanding paper. The sanding paper would have disintegrated in the time that it took me to get this particular bottle sanded (about 40 minutes).

painted glass bottle

The finished product. When I was finally finished with the cutting and sanding I decided to spray paint them as well to give them a nicer, more festive look. I used Krylon’s Stone Metallic in Gold, which gives the plant holders a stone-textured look.

Bottle Plant Holders

Making Bottle Plant Holders was a simple DIY project that came together with the right tools.

Please leave a comment below to let us know what you think.


Do you have a DIY project you would like to show off?

Send an email to contact@jagerfoods.com with your picture(s), your name and a description and or any tips you would like to share with us and our readers. If you have a blog you can also include the web address and we will link back to you.

2015 Most Popular Bottle Lamp Projects On Pinterest

cut square bottle project idea

It was a very exciting year for us and many of our fellow bottle crafters.

We saw a ton of new and inspiring craft ideas made from recycled bottles in 2015. It was truly a fun year!

It’s always interesting and fun to look back and reminisce with the bottle craft projects. If you look back at the last year you might see some familiar ‘pins’ and you might find something new that you have never seen before. Either way, let us know which ones you have enjoyed. You can also throw in some ‘honorable mentions’ as well!

#10 Fireball Bottle with Lights

Fireball Bottle with Lights

#9 Make a bottle lamp for your #mancave or to give to a friend.

Hendricks Gin Bottle Lamp

#8 Mermaid Lighted Wine Bottle, Hand Painted Lamp Illuminated Night Light, Nautical Beachy Starfish Home Decor, Beach Art, Tropical Gift, Ocean

Mermaid bottle light

#7 This is so awesome! Would be cool for Christmas as well.

Halloween bottle light

#6 How to make a Jack Daniels Bottle Lamp **DIY Jack Daniels Lamp**

Lamp with Jack Daniels' bottle

#5 Winter Scene Gallon Jug LED Bottle Light by BottlesBeGlowing

Bottles Be Glowing lighted bottle

#4 Silver Patron and Fireball Whiskey Lighted Bottles by Ruth | How to Make A Bottle Lamp

Silver Patron Bottle with Lights

#3 This is a wonderful, home made gift idea for the Holiday season! Simply use a Holiday print fabric for the cover and cinnamon or pine scented potpourri.

DIY Potpourri Warmer

#2 Learn how to cut square bottles. Project idea for Jack Daniel’s candle. #howto #recycledcrafts

cut square bottle project idea

#1 Lighted Absolut and Jack Daniel’s Bottles by Julie | How to Make A Bottle Lamp

Jack Daniels Bottle Lamp

There you have it. These 10 picks were compiled from the Pinterest analytics page that tracked impressions based on the Bottle Crafts page. We kept the titles exactly the same as they appear on Pinterest.

Do you see something you like? Did we miss your favorite Recycled Bottle Project? Let us know and leave a comment below! :)

Seasonal Bottle Craft Decor

#Christmas #Light #Decor

Decorative lighting can add warmth to any room in your house to make it feel cozy.

There is something to be said in the defense of traditional light strings; they do have a nice warm glow to them. Decorating with Christmas Lights is perfect for this time of year!

I’ve jumped on the eco-friendly band wagon myself a couple of years ago and made a conscious effort to use LED light strings for most of my bottle art projects. The LED’s are nice, don’t give off heat and are more energy-efficient than regular light strings. But to really get a certain feel for your holiday projects doesn’t a little warmth (visually not literally) sound good?

On our last trip to Minnesota Silke and I picked up a couple of beer growler (filled of course) from one of our favorite local micro brewer’s. It was too hard to not want to bring back a little Minnesota with us.

The Jack Pine growler fit the bill perfectly and we both knew it was not going to make it back for a re-fill. :)

Jack Pine bottle light decor

By adding a string of 50 Christmas Lights to this unique one-of-a-kind growler, I was able to offer a little more of an ‘Up North’ atmosphere to our main living area. It rests on our fireplace that also is home to a little potted pine tree that we keep lit up year round.

The soft white light that both of these pieces offer brings a nice warm cozy feel to a room that is the largest in the house.

potted pine tree and bottle light decor

Adding a string of white lights to your room, hang it around a door frame or even wall art, can offer a sufficient amount of light for when you come home in the evening. It gets dark out way too soon during the winter months, honestly.

The light sets you see in the pictures run on a timer. This offers us the hassle free option to not having to plug and un-plug them. Wouldn’t you rather have inviting lights on in your home when you arrive after a busy day?

seasonal bottle light decor

We have enjoyed our lighted pine tree for several years now and we never take it down because it really dosn’t feel like a ‘seasonal thing’.

The year round enjoyment you can get from simple lighting feature like a beer growler filled with a plain light set might be all you need to make your home feel more personable.

Not sure how to make a beer growler with lights? Check out my article; ‘Tips for drilling a glass bottle‘.

Do you have any decoration ideas that include traditional light strings? We are always looking for new ideas so please leave us a comment below. 

Bill’s Cut Bottle Projects

Mountain Dew Bottle crafting

Over the last couple of weeks Bill has sent us several of his bottle project pictures.

First of all, I would like to apologize to Bill for not posting his pictures sooner. Thank you Bill for following up with us and sending us another picture.

With everything that’s been going on in our lives recently (yes, I admit it, I forgot about his first email in our inbox for a while) we just didn’t find the time. Our daughter recently moved to Colorado, we were more than anxious about her solo 3 day road trip, and we sold our town home in Summerville so we spent a lot of our free time packing and re-organizing.

Alright, enough about us, here are Bill’s bottle project pictures:

Getting ready for bottle craft projects

A whole bunch of empty bottles

Glass Bottle Projects

Nice job turning recycled bottles into lamps, glasses and vases.

Mountain Dew Bottle crafting

A Mountain Dew Shot Glass & Chaser – Very cool!

Bill, thank you again for sharing your glass bottle project pictures.

We are sure you will inspire many newby bottle crafters. You have a very nice collection. Keep the pictures coming. :)

What do you think of Bill’s bottle crafts? Questions? Feel free to leave him and/or us a comment below. 


Do you have a DIY project you would like to show off?
Send an email to contact@jagerfoods.com with your picture(s), your name and a description or any tips you would like to share with us and our readers. If you have a blog you can also include the web address, we will link back to you.

The Saber Tooth Diamond Sanding Kit Review

Nick reviews the Saber Tooth Sanding Pads

Cutting your glass bottles takes practice, persistence and a finishing touch.

Once you have your glass bottle separated you quickly find out that you will need a little more work to get it to the finished line… the glass edges need to be sanded smooth.

Sanding glass can be relatively easy as long as you have the right tools to do it. Conventional wet sandpaper will work in a pinch but really is not built to last. This all has changed once again thanks to Bottle Cutting, Inc’s latest invention:

The Saber Tooth Diamond Sanding Pads

This ergonomically correct sanding pad kit is not only easy to use but makes the sanding process super quick.

Saber Tooth sanding pads by Bottle Cutting Inc.

For my initial test run I hand sanded a separated glass bottle that I had on hand.

Working with the heavier 60 grit pad first, I was easily able to take all the rough edges off. Following up with 400 grit pad and finishing it off with the 2000 grit sandpaper gave my cut glass the nicely rounded smooth edge that you would expect for someone who wants to use the bottles as drinking glasses. Scroll down to watch a video where I use the Saber Tooth pads in action…

I had to find a challenge – Set back in the far reaches of my cupboard sits one of the bottles that I had run into a little bit of a hiccup while I was cutting it. When the bottle separated it left a huge chip out of the edge that ran along the front label side of the bottle. This wasn’t a paper label bottle and it wasn’t the kind of beer you could just run up town and find a quick replacement for. I was dismayed that this had happened but I couldn’t bring myself to throw the bottle away. Then the Saber Tooth Sanding Kit arrived in the mail and my faith in salvaging the bottle, and the reason why I kept this bottle for so long, finally came into light.

Sanding a cut bottle

What I was about to attempt to do was going to take a lot of sanding so I really thought that this would be the perfect test to see if these sanding pads were up to the task. It was amazing to see how quickly the 60 grit pad was taking down the glass.

I had been at it for a little while, my arm was starting to get a little tired and the glass was actually starting to get warm. A quick splash of water and I went right back to work, sanding off a tiny bit of glass at a time.

Simply amazing! Not only was I able to sand out the obvious divots in the glass bottle but I was also able to give it that round polished look that I wanted to achieve when I first started the whole project.

I rinsed the sanding pads off and they still looked like they had just come right out of the box!

I am not making this statement lightly considering how long I actually spent sanding on that one single bottle. No way would I make a habit of doing this. If it were any other bottle I would have simply thrown it away and started over. This one of a kind bottle was salvaged thanks to these sanding pads.

A game changer when it comes to bottle cutting? Definitely.

I really can’t imagine going back to regular course sand paper again. With minimal effort you will find that the pads will take off the rough edges and give your cut glass bottles the smooth finish you want for all of your bottle crafting projects.

Bottle Cutting Products

I would like to thank Jennifer from Bottle Cutting Inc. for contacting us about their wonderful new product. If you would like to see the full line of bottle cutting tools & accessories they have, be sure to check out their website at: Bottlecutting.com

We also received the separation ties and will do a separate (no pun intended) blog post for that at a later time. :)

Happy bottle crafting,

Nick

What do you use to get a smooth edge on your cut bottles? Leave me a comment below.

The Bottle Bit Review By Bottle-Lamp.com

Bottle Bit Review

Scoring and separating your glass bottle can take a little time and practice. You have that mastered, ‘Now what’?

Let me introduce to you the Bottle Bit by MasterFab. The bottle bit works as a tool to help you get a consistent and even sanded finish for your cut glass bottles. Working in conjunction with my cordless drill, I was able to sand down all those rough edges and give my finished glass bottle a nice smooth finish.

Bottle Bit Review and How To Video

The main component will go into your drill like a regular bit. It will look like a hole saw that they use to drill door holes with. The clamping device that can also be purchased in conjunction with it can easily clamp to any table or work bench. I attached everythig to a wooden folding table in the back yard. Once I had my drill set up I used the cozy and one of the rubber wraps that comes with the bottle bit. Wrapping the bottle with the rubber matting and placing it inside the cozy gave everything a nice snug fit. The last thing you want is for this thing to come flying out.

With a cup of water at my side I began the sanding process. In less than a minute the water on the edges began to turn a milky white. If you have ever sanded your bottles down by hand you will immidiately appreciate the time that you are saving with this device. I started out with a coarse sand paper to make sure I was getting all the little shards taken out. From there I finished it off with a lighter grade of sand paper.

I have seperated quite a few bottles and we have them sitting all over the house (yeah, I may have to go in for therapy). Spending the time to sand all of them down was really not a high priority for me. What I would do is lightly sand them, just enough to take off the really sharp edges and call it good. Looking at them you could tell they needed more attention but again it wasn’t high on the ‘to do list’.

Buy The Bottle Bit Here

The Bottle Bit has changed everything about glass bottle cutting for me. I literally had the thing out of the box and set up in the back yard in no time at all. With it’s ease of use sanding bottles isn’t a chore anymore and is actually quite fun. Who wouldn’t want to see the final result actually look like a finished product?

We would like to thank Don for sending us his product for review. The Bottle Bit is currently available through Amazon where you can also purchase the four piece ‘Switch and Lock Drill Mount’. Please leave us a comment below and let us know what you think of this ‘must have tool’ for bottle crafters.

C&C Bottle Cutter Review By Bottle-Lamp.com

CC Bottle Cutter

We would like to introduce to you the C&C Bottle Cutter kit from Europe.

This lightweight bottle scoring device is made from laser cut plywood. It is then hand sanded and assembled with the end-user only having to attach the scoring wheel. A small screw driver comes with the kit for mounting it to the device. Once assembled your ready to roll!

CC Bottle Cutter Kit

I was amazed at how light weight it was. The adjustable platform allows you to accommodate a large-scale of different sized bottles with ease. This is the perfect addition to your DIY craft tool arsenal. In no time at all you will be scoring bottles for pendant lights, wind chimes or drinking glasses. Overall I would recommend this for anyone who would want to give bottle cutting a try. It is a straight forward no non-sense bottle cutter that fits the bill for any hobby enthusiast.

Want to see this bottle cutter in action?

Watch our video on YouTube here.

The C & C Bottle Cutter kit comes with:

  • 1 plywood bottle cutter body
  • 2 rubber rings (diameter 60 mm)
  • 3 different grit size (60, 120, 180) sandpaper
  • 1 cutting tool (includes 6 tungsten carbide blades)
  • 1 screwdriver
  • 1 strap
  • 1 plywood strap holder

CC Bottle Cutter

Other optional kits that you can purchase come with a stained brown or stained black finished cutter body. The ccbottlecutter website offers a FAQ section along with links to their video channel that offers further instructions.

This bottle cutter will not score square bottles (Sorry Jack Daniels), but with the adjustable platform you will be able to accommodate a variety of different sizes and length glass containers.

CC Bottle Cutter with extras

We would like to thank Kristoph, Tom and Krista for allowing us to review their bottle cutting tool.

If you have any questions about the products they offer, you can reach them on their ccbottlecutter website or on their Facebook page.

Is this the perfect bottle cutter for you? Leave us a comment below.

How Can We Make The Ideal Lampshade For A Bottle Lamp?

DIY Lamps

We received an email from Peggy who has been perplexed by the same question many of us are.

Let’s see what she said. Here is our reader’s email:

“Hello, my friends. I hope everything is well as usual. There is one question I have found no satisfying solution to yet. I love bottle lamps without any doubt and my old grandfather has various liquor bottles for me to choose from. The problem is that I need to make some special lampshades to match them. I have some good ideas, I just can’t seem to bring what’s on my mind into the real world. Sadly I’m an expert in imagining but dull in operating.

I took out all the ornaments and craft supplies I had collected in the last few years including some bead strings, glass orbs, crystal fillers, colorful ribbons and some exotic cloth. I intended to blend these materials to tailor the perfect shades for those bottles by integrating them with my own flavor. Unfortunately, I only have fabulous ideas with no skills to fulfill them. Could you please give me some advice?”

You must have felt very excited when these wonderful ideas occurred to you, good for you, but as you found out yourself it’s not always easy to turn an idea into a usable item.

Design Your Own Lamp

Unique DIY Bedside Lamps

Recently I have found a nice website named Parrotuncle who provides not only some creative and recyclable bottle lamps, but various other DIY indoor light fixtures, supplies and accessories.

Most surprisingly, the site has a “You design it, we make it happen” field in which you can describe whatever you have on your mind and get it all customized. This might be exactly what you’re looking for.

We do have some personal experience with making DIY lampshades for our DIY bedside lamps as well. At one time, I was doing a sort of faux embroidery as I was sewing the embroidery on a discarded white summer dress and then cut the dress into a roll shape in order to cover an old drum shaped lampshade.

Another interesting DIY process was with the use of a toy parasol and a number of flickering clear beads. I arranged those beads in a pendant pattern and hung them around the brim of the parasol top which I then attached to the lamp base.

It’s frustrating when you have big innovative ideas but no way to make them known to the world. Since everyone has his or her own limits a site like Parrotuncle can surly be helpful. Can’t wait to see what you will come up with. We hope you’ll remember to show us.

Lighted Wine Bottle Lamp

decorated wine bottle lamp

We received this wine bottle lamp picture for our show off submission page on the Bottle Crafts DIY page on Facebook.

Here is the message Keli sent us along with her picture.

This was my first bottle light ever attempted. I gave it to my sister-in-law for Christmas. It was such a hit I have decided to make no less than 20 more to use in my centerpieces for my wedding in September. – Keli

decorated wine bottle lamp

Your wine bottle lamp turned out absolutely stunning Keli! Simply love the way you decorated your bottle and having an on/off switch makes it so much more user friendly. Well done!

We would like to congratulate you on your upcoming wedding and wish you and your future husband a long and very happy marriage!

Thank you for sharing this wonderful craft work with us and our readers.

Before you move on dear reader, make sure to connect with us on Facebook. We share not just our own blog submissions and creations, but many of our fellow recycled crafter’s pictures and articles as well.


Do you have a DIY project you would like to show off?

Send an email to contact@jagerfoods.com with your picture(s), your name and a description or any tips you would like to share with us and our readers. If you have a blog you can also include the web address, we will link back to you.